Carving a pumpkin: Instructions in four steps
The best pumpkins to carve are those with a hard skin and soft flesh. If you are making autumnal decorations with children, choose larger specimens. Small pumpkins are often too hard. Once you have found a suitable pumpkin, all you need is the right pumpkin carving tools: a large, sharp knife, a sharp-edged spoon or an ice cream scoop and a smaller, sharp knife or a cutter for the finer details.
Then off you go:
Step 1: Remove the lid
First draw a line with a waterproof pen. Ideally around the stem. If this remains in place, the lid can be easily removed later, for example to change the candle. Cut out the lid of the pumpkin in a wedge shape so that it does not fall in later. A large, possibly serrated knife is best for this.
Step 2: Hollow out the pumpkin
First remove the seeds and fibers. This can usually be done by hand. Use a spoon or ice cream scoop to scoop out the pumpkin. It is best to remove enough flesh to leave about two centimetres of skin. Don't throw away the flesh and seeds! They are perfect for soup and crispy toppings.
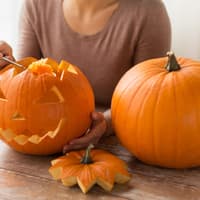
Step 3: Carve a face or pattern into the pumpkin
A scary grimace, a funny face or a pattern: what do you want the pumpkin to look like later? The easiest way is to draw the pattern on with a pen first - you can use the marker from step 1 to draw pumpkin faces or other patterns on the autumn vegetables. Or you can cut out stencils, stick them onto the pumpkin and cut out the pattern accordingly.
Use a small knife to carve along the contours of the pumpkin. If you start with the straight cuts, you will get some practice with the intricate parts. It is even easier if the lines are first punctured with a nail or a thick needle. Holes can be punched into the shell with an apple corer. With small pumpkins, you will have more success with a drill. Instead of a spooky grimace, the autumn vegetables also look great with a playful hole pattern or modern geometric pattern, for example.
Step 4: Staging the pumpkin
To prevent the pumpkin from rotting too quickly after carving, rub the inside and the cuts dry with a kitchen towel. Sawdust inside will absorb moisture later. A little Vaseline on the cut surfaces also delays rotting. Whether equipped with an electric light or a lantern, the pumpkin should keep for a few weeks in a cool, dry place.
You might also be interested in this:
Creative fall decorations with pumpkin art
Halloween recipes: cakes, muffins & pumpkin dishes
Pumpkin smoothie and co.: a different take on the fall vegetable
Autumn vegetables and fruit: what's in season now
DIY fall decorations: Stylish hunting trophies
Autumn decorations for outdoors: great DIY ideas